
0%On this pageContents
How to record a webinar is usually the question a few minutes before you present: is this session being captured, and where will the copy be afterwards? This page covers recording a webinar you run live in EasyWebinar, the webinar platform. Recording is on by default, the room header tells you so, and the finished session lands in your Library under Recordings, ready to reuse as a replay or as an evergreen webinar's content.
At a glance
| Is my webinar recorded automatically? | Yes. Auto Recording is on by default for live sessions |
| How you know it's on | The room header shows Auto Recording Enabled before you start |
| How you know it's running | The badge changes to Recording once you go live |
| Where you change it | In the live room, Settings → Recording Settings |
| Where the recording goes | Library → Recordings, named after its webinar, with its duration and date |
| What you can do with it | Use it as a replay, or pick it as the video for an evergreen webinar |
| Storage | Recordings are hosted in your Library and use your storage allowance |
| Not in the recording | Drawings on a shared screen, and an attendee zooming in on what you share |
- Run a live webinar: the full guide to the live room, from the green room to End Session.
What automatic webinar recording covers
Picture the last ten minutes before a live session. Your slides are open, a co-host is waiting backstage, and you suddenly wonder whether anyone pressed record. In EasyWebinar you don't have to press anything: Auto Recording captures the live session you host, and the result appears in your Library when the session is over.
Automatic recording is a setting of the live room. It stays on unless you switch it off, so each live webinar you run produces a recording you can find, name and reuse. The recording is the raw material for everything that comes after the live hour: the replay for people who missed it, and the content of an evergreen version.
What you see on the screen
You see the recording status before you broadcast anything. When you enter the room you land in the green room, where nothing reaches your audience. Its header shows Not Live and whether recording is on.
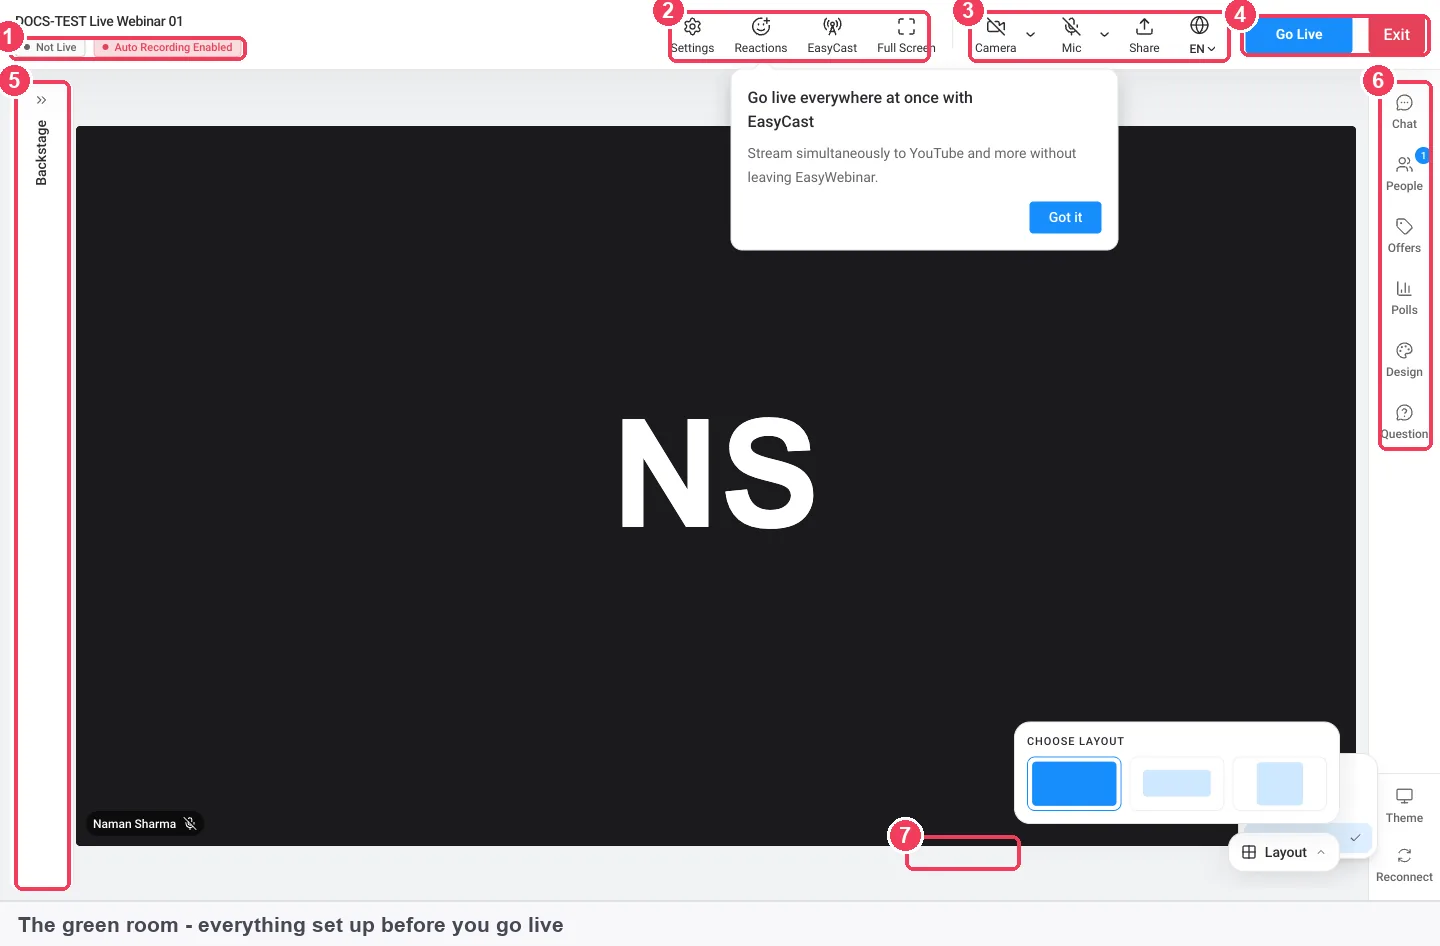
Read the header in two moments. Before you start it says Auto Recording Enabled. Once you click Go Live, the badge changes to Recording, and the header also shows LIVE with a timer.
Why webinar recording matters
What it's for
Recording a webinar gives you a copy of the live session without anyone having to remember to start it. That copy is what you send to people who missed the hour, and what an evergreen version plays later.
How it helps
- Nothing to remember: recording is on by default, so a busy start can't cost you the session.
- A visible check: the header says Auto Recording Enabled before you start and Recording once you're live.
- One place to look: every finished session lands in Library → Recordings with its webinar's name, duration and date.
- Reuse without exporting: pick the recording as an evergreen webinar's video straight from the Library.
What happens without it
Without a recording, the live hour is all you get. Registrants who couldn't attend have nothing to watch, and the talk you prepared can't run again unless you present it again. The replay is usually watched by more people than the live session, so losing it loses most of the audience.
Who this falls to, and when
It falls to whoever hosts or produces the session, usually in the minutes before going live. It matters most to anyone who sells from a replay or turns a good live session into an evergreen one. A course creator opening enrolment is a typical case.
The EasyWebinar approach to webinar recording
Take a typical case. A course creator sells a self-paced bookkeeping course for freelancers and runs a free live workshop on the first Monday of each month. About a third of registrants attend live, and the rest ask for the replay the next morning. She presents alone, so she watches the chat, the clock and her slides at once.
The usual workaround is to start a separate screen recorder on the laptop just before going live. It tends to work until the morning it doesn't. The recorder was never started, or the microphone wasn't selected. Even when it works, the file sits on one laptop until someone uploads it.
The plain logic is that a recording matters only if it exists when the session ends. A setting that is on until you turn it off is safer than a button you have to remember under pressure. The copy is also more useful when it lands where the replay and the next webinar are built.
EasyWebinar records the live session you host by default. It shows the recording state in the room header before you broadcast anything. It then saves the finished session to your Library under Recordings, named after its webinar. From there you can use it as the replay or pick it as the video for an evergreen webinar.
In the green room, the header reads Auto Recording Enabled before you click Go Live, and Recording afterwards. How that compares with other platforms is covered in How EasyWebinar compares for webinar recording, below.
How webinars get recorded
There are three common ways a webinar gets recorded. Each one catches some failures and misses others, which is why the default matters.
Recorded automatically by the webinar platform
The platform captures the session from its own side, without a button press. It catches the most common failure, which is forgetting to start. It also keeps the copy next to the webinar, so reusing it needs no upload. What it can miss is anything the platform doesn't include in its recording, so you still need to know what that is.
Started by hand in the room
Some setups ask the host to press record once the session begins. It gives control over the start and end, but it fails quietly when nobody presses the button. The first minutes are often the ones lost, because that's when the host is busiest.
A screen recorder on your own device
A recorder on your computer or phone captures whatever is on your screen and the audio you choose. It works for any session you can see, but it records only your view. It depends on you starting it, choosing the right audio and keeping the device awake. The file stays on that device until you move it.
What's confirmed for EasyWebinar
For live webinars you run in EasyWebinar, the confirmed method is the first one. Auto Recording is on by default, its state shows in the room header, and recorded sessions land in Library → Recordings. Two things are confirmed as never in the recording: drawings on a shared screen, and an attendee zooming in on a shared screen or file.
Before you go live: check the recording
The check takes seconds, and the green room is the place to do it, because nothing there is broadcast.
- From the webinar's Overview, click Enter Room.
- Pick your camera, microphone and speakers, then click Continue to Green Room. The button stays greyed out until the room can see a working camera and microphone.
- Look at the header. It should read Not Live and Auto Recording Enabled.
- If it doesn't, open Settings → Recording Settings and switch recording on.
- Get your offers and polls ready, because the Go Live confirmation reminds you to.
If the room won't let you in at step 2, the camera or microphone isn't being detected. The fix is in Camera not detected.
What the recording leaves out
Two things that attendees see live never reach the recording, so plan your session around them.
Drawings on a shared screen
If you draw on a screen or slides you're sharing, attendees see the drawings live. They are removed when you stop sharing, and they are not in the recording. If a diagram matters to replay viewers, put it on the slide itself rather than drawing it during the session.
Attendees zooming in
Attendees can zoom in on a shared screen or file to read small text. The recorder doesn't turn zoom on, so recordings never include it. So make small text large enough for replay viewers to read as it is.
Tell people they are being recorded
A recording captures your presenters and anything they share. In the UK, data protection legislation controls how organisations use personal information, so say at the start that the session is recorded. Tell guest presenters before they join the stage.
How to check a webinar recording is complete
You can't watch every recording end to end, so check two things that tell you most of what you need.
Measure 1: duration against time live
Before you click End Session, note the LIVE timer in the header. Afterwards, find the session in Library → Recordings, where each card shows its duration. A recording far shorter than the time you were live is worth opening before you send the replay link.
Its weak spot is that duration tells you length, not content. A recording can be the right length and still lack the drawings and the zoomed views described above.
Measure 2: a card for every session
Each recording is named after its webinar and dated. If you ran a session and there is no card with that webinar's name and date, recording was off. Check Recording Settings before your next session.
Its weak spot is that a webinar run several times has several recordings with the same name. Use the date on each card to match it to the session.
For audience numbers once the replay is out, use Webinar analytics.
How to record a webinar with a screen recorder
If you need a copy of a session you're watching or presenting outside EasyWebinar, a screen recorder on your own device is the general method. This records only what is on your screen. On a Chromebook, for example:
- Open the session in a window on its own, and close notifications you don't want captured.
- Press Shift + Ctrl + Show windows, then choose Screen record.
- Choose whether to record the full screen, part of it, or one window.
- Open Settings and select Device audio and microphone if you need both the session audio and your voice.
- Start recording, and keep the device awake and plugged in for the whole session.
- When the session ends, select Stop recording.
- Find the file. Chromebook recordings save to the Downloads folder unless you choose another folder.
On an Android phone, the Screen record tile in Quick Settings does the same job, and recordings appear in the Photos app.
What this misses: you have to remember to start it, the audio depends on your choices, and the file stays on your device until you move it.
The same job in EasyWebinar
For a live webinar you run in EasyWebinar, you skip steps 2 to 7. You check that the header reads Auto Recording Enabled, go live, and find the session in Library → Recordings afterwards. If you do have a video file of your own, Add Media → Local import uploads it to the Library, where EasyWebinar hosts it like any other video. Video hosting covers that.
Worked example: checking a quarter of recordings
This is an illustrative calculation with sample figures, not an EasyWebinar output. A host checks three monthly sessions by comparing time live with the duration shown on each recording card.
| Session | Went live | Ended | Time live (end minus start) | Duration on the card | Result |
|---|---|---|---|---|---|
| January | 19:00 | 20:05 | 65 minutes | 64 minutes | Complete, send the replay |
| February | 19:00 | 20:10 | 70 minutes | 22 minutes | 48 minutes short, open it before sending |
| March | 19:00 | 19:55 | 55 minutes | No card | Recording was off, check Recording Settings |
January passes the check. February is short by 70 minus 22, which is 48 minutes, so the host watches the end before sharing it. March has no card at all, so the fix is in the room's settings before the April session.
How to record a webinar in EasyWebinar
Recording needs no separate setup when you leave the default alone. The steps below are what to check and where to look.
- Open the room and confirm the header reads Auto Recording Enabled.
- If you need to change it, open Settings → Recording Settings.
- Click Go Live and confirm. The badge changes to Recording.
- Present, then click End Session and confirm.
- Open Library → Recordings and find the session by its webinar's name and date.
- Use it as a replay, or pick it as an evergreen webinar's video.
What to have ready
You need a scheduled live webinar, which Create and schedule a live webinar walks through. You also need a working camera and microphone to enter the room, even if you turn them off afterwards.
Change the recording setting
In the live room, click Settings, then Recording Settings. The settings dialog also holds your device settings and room preferences such as chat and Q&A moderation.
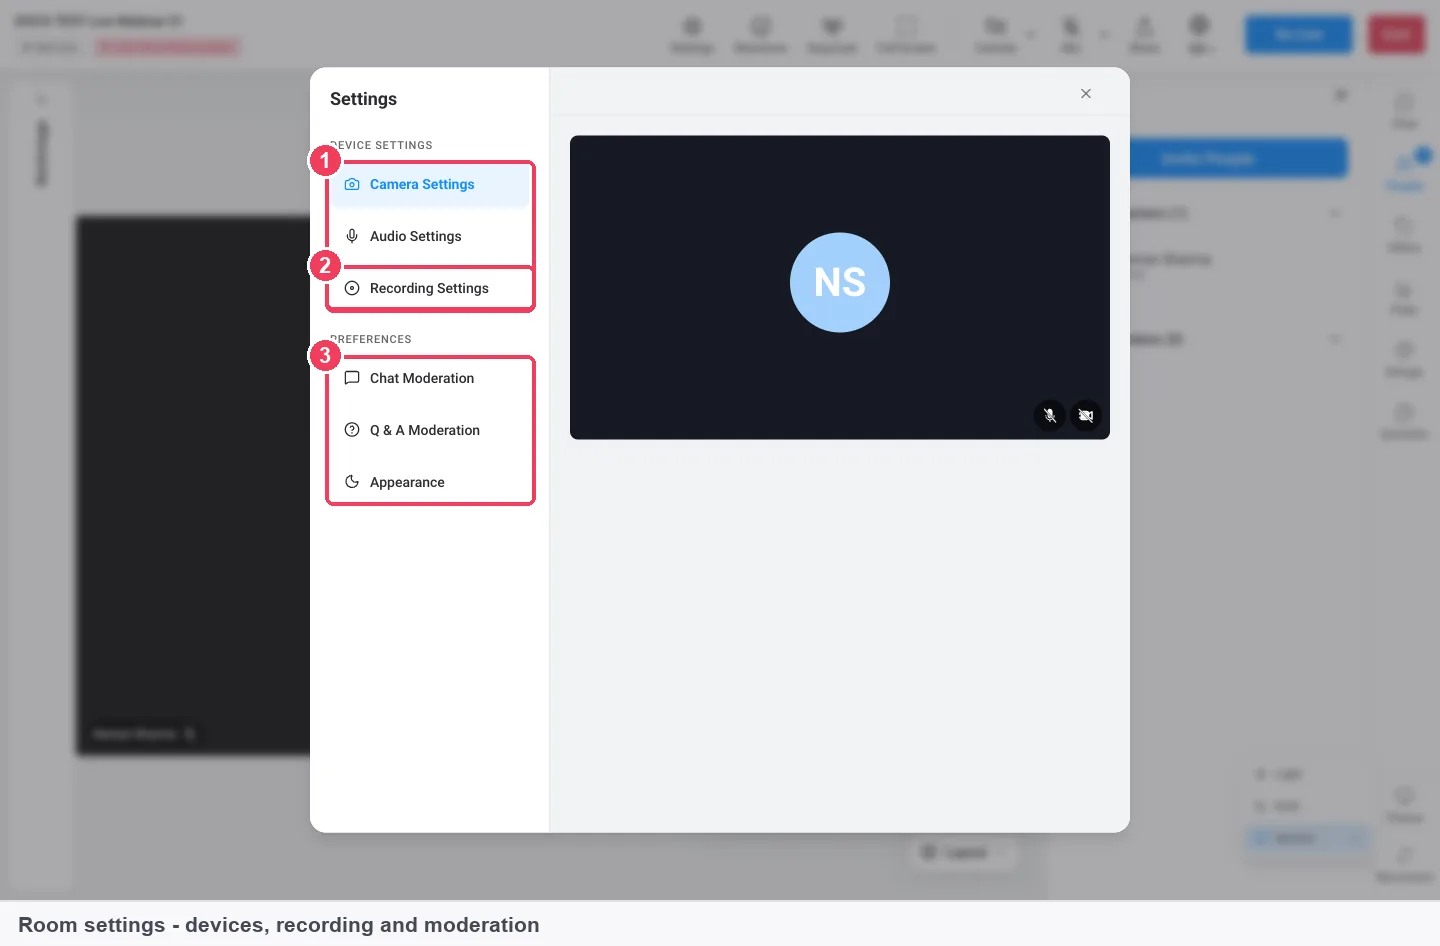
Leave recording on unless you have a reason not to. The replay is usually watched by more people than the live session.
Go live and end the session
Go Live asks you to confirm and tells you anyone in the waiting area will be moved in. The header then shows LIVE with a timer, and Go Live becomes End Session. End Session disconnects everyone and nobody can rejoin, so it asks you to confirm.
Find the recording
Click Library in the sidebar, then the Recordings tab. Each recording is named after its webinar, with its duration and the date it was recorded. Your storage is shown at the top of the tab.
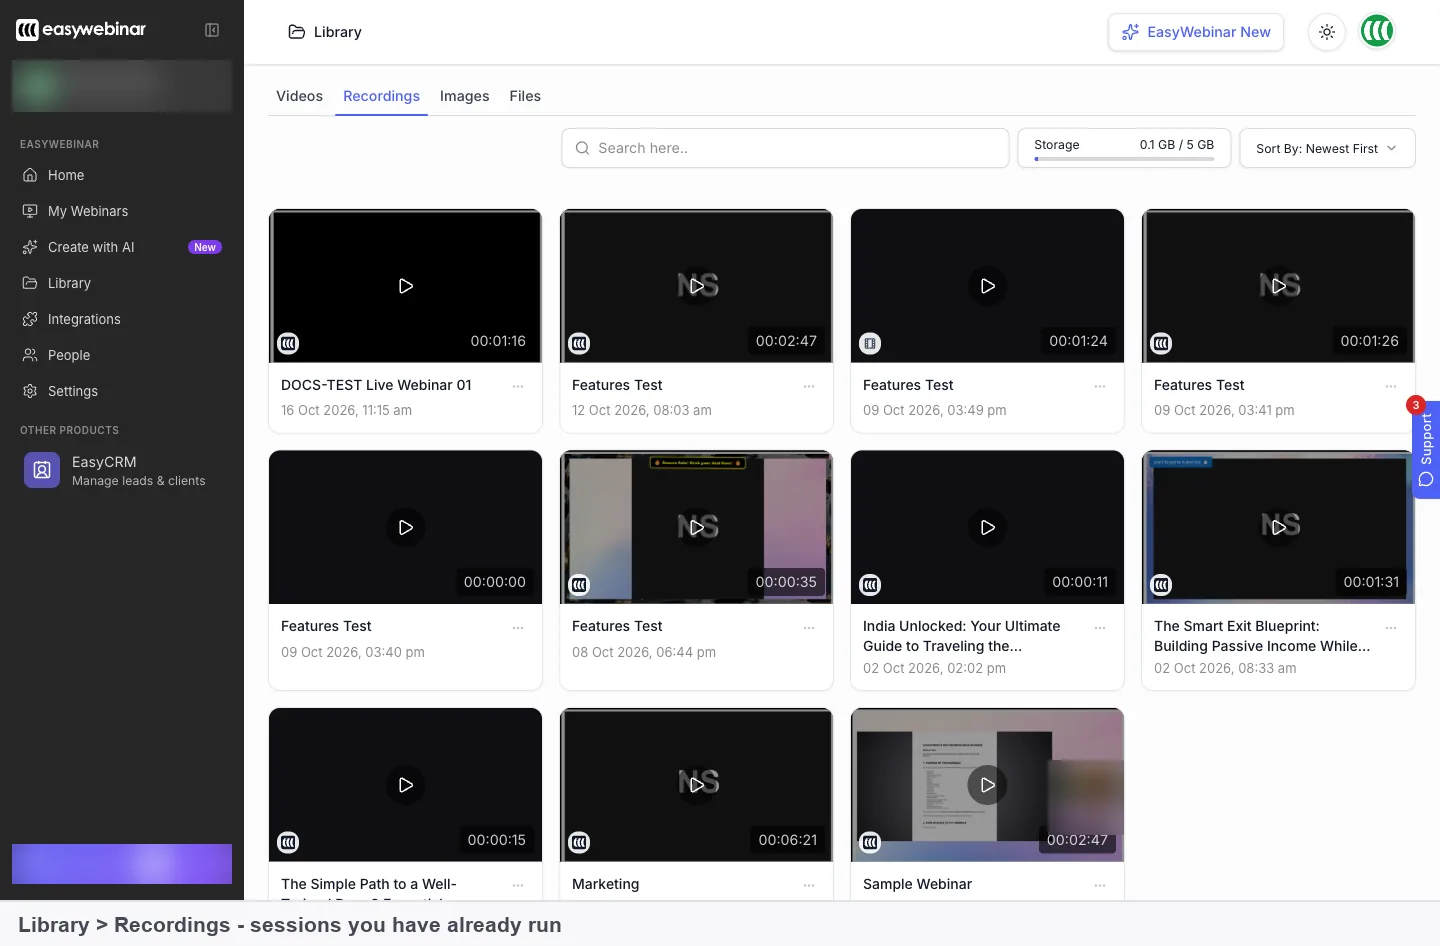
The Library page explains the other tabs and how storage is counted.
This EasyWebinar video shows the Library, where you can also upload your own webinar videos.
Use the recording again
There are two main reuses. As a replay, the recording serves people who missed the live hour, set up through Replay pages. As an evergreen webinar, clone the webinar as Evergreen and pick the recording when you choose the video.
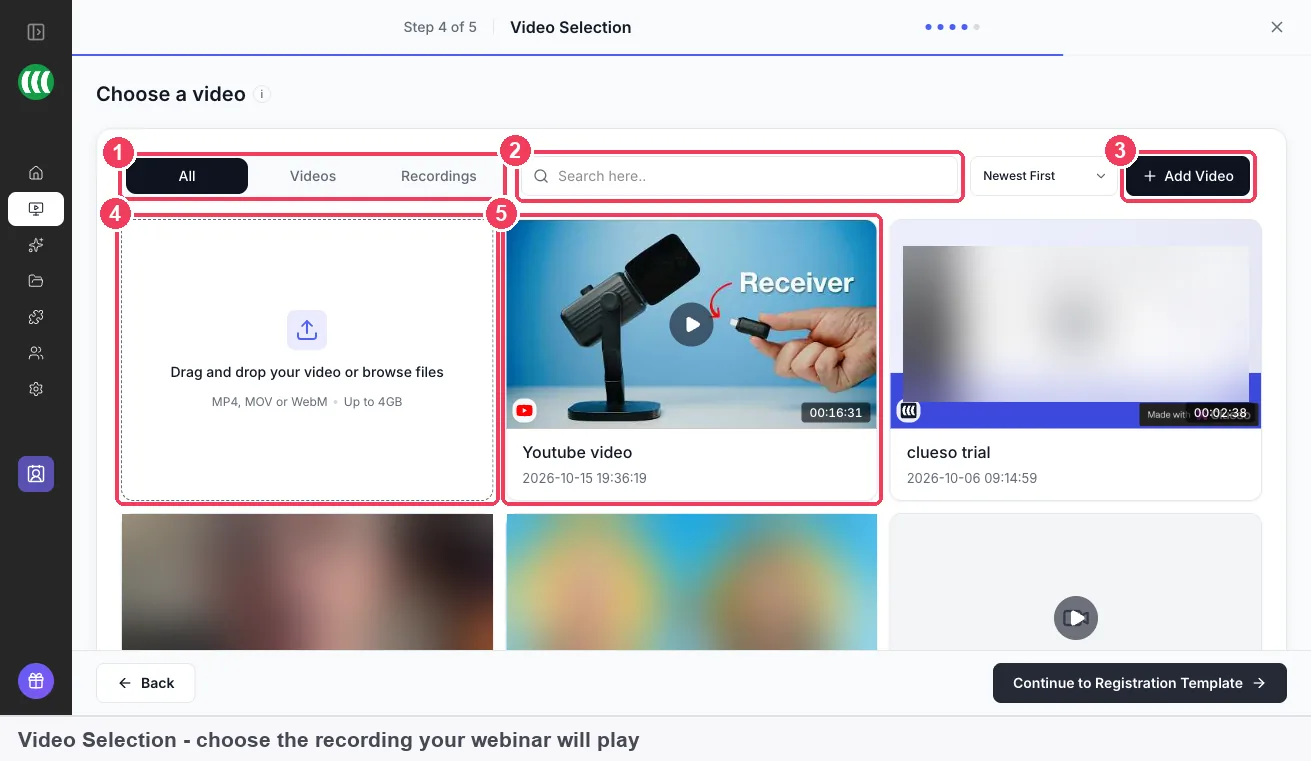
Recordings also appear on the Recordings tab of the video picker during webinar setup, so you pick it where you pick any other video. Create an evergreen webinar covers the rest of that setup.
This EasyWebinar video shows how to set up a replay that expires.
What works with webinar recording
- The live room: recording state shows in the header, and the setting sits under Settings in the live room.
- The Library: finished sessions land on its Recordings tab, next to your videos, images and files.
- Replays: a recording becomes the replay for people who missed the session, through replay pages.
- Evergreen and simulive webinars: both take their content from the Library. Create a simulive webinar and Create an evergreen webinar show where you choose it.
- Storage: recordings are hosted in the Library and count towards your allowance. Extra space is an add-on, listed on pricing.
Who records their webinars
Course creators
A course creator who opens enrolment with a monthly live workshop needs the replay by the next morning. Recording is on before she starts, and the session is ready in the Library to share. The Selling online courses with webinars guide covers the rest of that launch.
Coaches and consultants
A coach who runs one strong live session can turn it into an evergreen version that plays on a schedule. The recording is the starting point, picked straight from the Library during setup.
SaaS and product teams
A product team running a live release walkthrough wants a copy for customers in other time zones. They check the header in the green room, go live, and point latecomers to the replay. On Demand covers letting people watch straight after registering.
Customer success teams
A customer success team running live training wants each session kept with the webinar it came from. Each recording carries its webinar's name and date, so the team can find last quarter's session quickly.
How EasyWebinar compares for webinar recording
EasyWebinar records each live session you host by default, keeps the result on a Recordings tab in the Library, and lets you pick it as an evergreen webinar's video. The recording state is visible in the room header before you broadcast anything.
Webinar recording features, from each platform's public documentation:
| Platform | Live sessions recorded automatically | Past live recording as an automated webinar's video | Recordings on their own library tab |
|---|---|---|---|
| EasyWebinar | Yes | Yes | Yes |
| Demio | Yes | Yes (Automated Event from past Sessions) | Partly (Schedule page, All Past filter) |
| WebinarKit | Yes (records all live sessions) | Yes (past session as video source) | Partly (recordings page per webinar) |
| WebinarNinja | Yes (broadcast starts the recording) | Yes (recording from past live webinars) | Partly (past recordings in a Replays picker) |
| StealthSeminar | Records at your streaming provider | Partly (you upload the recording yourself) | Partly (videos you upload to its library) |
| Livestorm | Yes (records when the event starts) | Yes (recording used for an on-demand event) | Not in docs |
Yes: documented and built in. Partly: documented with a limit, shown in brackets. Not in docs: not found in the vendor's public documentation.
Why EasyWebinar is the stronger choice for webinar recording
- Recording is built into the room. EasyWebinar records the live session you host by default, while StealthSeminar documents that you record the live event at your streaming provider and upload it. EasyWebinar vs StealthSeminar.
- Recordings have their own tab. EasyWebinar lists them under Library → Recordings, while Demio reaches them by filtering the Schedule page to All Past. EasyWebinar vs Demio.
- One recording, two reuses. EasyWebinar offers the recording as a replay and as an evergreen webinar's video, and WebinarNinja shows past recordings in a Replays picker when you add a video. EasyWebinar vs WebinarNinja.
Competitor details checked against each vendor's public documentation on 4 November 2026. Features and plans change, so confirm with the vendor before you decide.
Limits of webinar recording
- Live sessions you host in EasyWebinar. Automatic recording applies to the live room. This page covers no other kind of session.
- Drawings stay out. Drawings on a shared screen or slides are removed when you stop sharing and are not in the recording.
- Attendee zoom stays out. An attendee zooming in on a shared screen or file isn't captured, because the recorder doesn't turn zoom on.
- Storage. Recordings are hosted in the Library and count towards your storage allowance.
- Ending is final. End Session disconnects everyone and nobody can rejoin, so end only when you're done.
Common questions
Is my webinar recorded automatically?
Yes, for live webinars you run in EasyWebinar. Auto Recording is on by default, and the room header shows Auto Recording Enabled before you go live.
How do I know the recording is running?
Once you click Go Live, the header badge changes from Auto Recording Enabled to Recording. The header also shows LIVE with a timer.
Where do I find the recording after a live webinar?
Click Library in the sidebar, then the Recordings tab. Each recording is named after its webinar and shows its duration and the date it was recorded.
Can I reuse a webinar recording as an evergreen webinar?
Yes. Clone the webinar as Evergreen, then pick the recording when you choose the video. Recordings also appear on the Recordings tab of the video picker during setup.
Can I use the recording as a replay?
Yes. A recorded live session is the replay for registrants who missed it, and the replay is usually watched by more people than the live session.
How do I turn recording off for one session?
In the live room, open Settings → Recording Settings and switch recording off before you go live. Leave it on unless you have a reason not to.
Do recordings use my storage?
Yes. Recordings are hosted in your Library and count towards your storage allowance, which is shown at the top of every Library tab. Extra space is an add-on.
Are drawings on my shared screen in the recording?
No. Drawings on a shared screen or slides are removed when you stop sharing and are not in the recording. Put diagrams on the slide itself.
If an attendee zooms in on my shared screen, is that recorded?
No. The recorder doesn't turn zoom on, so recordings never include it. Make small text on your share large enough to read as it is.
Do I need a camera and microphone to record?
You need both to enter the live room, where recording happens, even if you turn them off afterwards. The Continue to Green Room button stays greyed out until the room detects them.
Can I record a webinar I run somewhere else?
This page covers webinars you run in EasyWebinar. For a session hosted elsewhere, the general method is a screen recorder on your own device, which records only your screen.
How can I tell a recording is complete?
Note the LIVE timer before you click End Session, then compare it with the duration on the recording's card. A much shorter recording is worth opening before you share it.
A webinar I ran several times has several recordings. Which is which?
Each recording carries its webinar's name and the date it was recorded. Match the date to the session you want.
Further reading
- Take a screenshot or record your screen (Chromebook Help): the screen recorder steps, audio choices and where recordings are saved.
- Record your screen on your Android device (Android Help): starting and stopping a phone screen recording and finding the file.
- Data protection (GOV.UK): the UK rules on how organisations use personal information, including recordings of people.
Related
Updated 4 November 2026: added how webinars get recorded, what the recording leaves out, how to check a recording is complete, the screen recorder method and a worked example.